Translate

Sunday, August 26, 2012

Tender Blueberry Cake


I always have left over stuff in my fridge, the other day it was buttermilk. The buttermilk was left over from the Red Velvet Cupcakes. So I used the buttermilk in some blueberry pancakes for breakfast. After that I had to think of what to do with an extra punnet of blueberries because I bought 2 punnets for the pancakes. 
 
Fortunately, I had to bring a dessert to my Parents' In Law's place for dinner, so I had a need to use up those lovely blueberries.
 
This cake was simple to make and I whipped it up in no time. My nephew commented that it looks heavy when he saw it, "we shall see", I said. After baking, it looks solid because of the extra sprinkling of sugar on top so it looked crusty. But when you cut into it, passed the crust, it was so soft inside. Oh my goodness, the cake was so tender and simply melt in your mouth.
 
This recipe is a keeper and easy to whip up to bring to a friend's place.
 
 See the crackled top! Thats what I want!
 
 Blueberry Cake
 
Ingredients
115 g unsalted butter, room temperature
110 g fine sugar
1/2 tsp salt
1 tsp vanilla extract
2 egg yolks
190 g cake flour
1 tsp baking powder
80 ml milk                  

Meringue:
2 egg whites
50 g fine sugar
125 g fresh blueberries
1 tbsp cake or plain flour

Topping:
1 tbsp fine sugar
 
Method
Preheat oven to 180 degrees C (350 degrees F) Grease and line with greaseproof paper a 18 cm (7 inch) square pan or 20 cm (8 inch) round pan.

Sift the cake flour, baking powder and salt together.
 
Cream butter and 110g of sugar until fluffy. Add the vanilla extract.

Separate egg yolks and the egg whites and put the whites aside. Add egg yolks one at a time to the mixture and beat until creamy.                   

Add the flour alternately with milk to the mixture. Coat blueberries with 1 tablespoon flour and add to batter.
                   
In a separate bowl, beat whites until soft peaks form. Add 50g of sugar, in a slow steam and beat until just under stiff peaks form. (Egg whites still shiny)


Fold egg whites into batter using a spatula. Pour into prepared pan. Sprinkle top with remaining 1 tablespoon of sugar.                

Bake for 50 minutes, or until cake tester inserted, comes out clean.  


Put on wire rack to cool.             


    Monday, August 20, 2012

    Soy Milk (Homemade and Organic)


    I have wanted to make my own soy milk for the longest time. My family members told me not to bother as it is pretty cheap and easily available in Singapore. "Spend your time making more desserts for us" they would say.

    I was in the supermarket the other day, I could not resist picking up the packets of organic soy beans which were staring straight at me. It was 2 to 3 times more expensive than normal beans but I was sure going to make my very first soy milk.

    To justify, I have to let my family know that it is ORGANIC so it will be different from those selling in the food market stalls.

    All you need are a blender, a big sieve, a muslin bag or a bag used for extracting coconut milk and a big pot. Easy!

    Well, it was delicious, tasted real rich and good and my family can really tell the difference. So I suppose they would not stop me from making soy bean milk anymore. It was worth the effort to make a healthy drink full of proteins. I must always remember to start a day earlier if I want to make for them as you have to soak the beans overnight or at least 10 hours.

    Ingredients

    300g organic soy beans
    2.8 L of water (2800 ml)
    250g of sugar, less if you do not want it so sweet
    8 pandan leaves (optional)

    Method

    Wash beans thoroughly and soak them overnight or at least for 10 hours.


    The next day, remove and discard the loose skins of the beans and wash rinse them again in fresh water and drain well.


    Wash and tie the pandan leaves together.
    Divide the beans in four portions to put them in the electric blender. Remember to keep to 700 ml per portion to make up to 2.8 Litres of water.


    Blend them in short burst of 30 seconds until all the beans are blended well. Pour them out into a big sieve over a big pot.


    As the pulp still contain lots of milk, it is best to put it in the muslin bag and squeeze out the remaining milk into the sieve and strain over the pot.
    Do this in 3 more rounds.
    I suggest you strain the milk one last time to obtain a pulp free smooth milk.


    Put the pandan leaves in the pot of soy milk and bring to boil on medium heat.


    When it is boiled, turn the flame to low and simmer, add the sugar and stir it once in a while.
    Do not let it come to a rolling boil or else the milk will start to curd.
    Simmer for another 15 to 20 minutes more and it will be ready.
    You can drink it hot or let it cool then chill it in the fridge to serve it cold.
    Enjoy!


    Sunday, August 19, 2012

    Churros and Chocolate


    My family likes anything with cinnamon and chocolate, needless to say this is one of them because it has both ingredients in it.

    A churro, sometimes referred to as a Spanish doughnut, is a fried dough pastry, predominantly choux based. They are fried until they become crunchy, and may be sprinkled with cinnamon sugar. The surface of a churro is ridged due to having been piped from a star-shaped nozzle.
    Churros are popular in Spain, France, Portugal and the United States. They are normally eaten for breakfast dipped in hot chocolate or cafe con leche.

    We ate it everyday when we were in Barcelona because it was sold in every street corner alongside the Tapas restaurants. With a little effort, it is easily replicated at home however. The plate of hot churros will be polished in minutes, I assure you.


    Recipe adapted from Donna Hay
    Makes more than 50

    Ingredients
    Cinnamon Sugar
    110g fine sugar
    2 tbsp ground cinnamon
    Pastry
    100g butter
    250 ml water
    150g plain flour
    1/4 tsp salt
    3 eggs
    vegetable oil, for deep frying
    Chocolate Sauce
    110g dark chocolate pieces
    140 ml milk
    1 tsp cornflour mixed with a few drops of water

                          
    Method
    To make the chocolate sauce, place the milk in a small pot, bring it to boil. Lower to a small flame when it is boiled. 
    Add the chocolate pieces to the milk and stir till all dissolved. Add in the cornflour mixture to thicken the sauce.
    Leave the chocolate sauce in the pot and heat it up when you want to serve it if necessary.
    Mix the sugar and cinnamon and set aside.
    Place the butter and water in another medium saucepan over high heat and bring to the boil. Reduce heat to low.
    Add the flour and salt and beat with a wooden spoon until mixtures leaves the sides of the pan.
    Remove from heat. Place the mixture into an electric mixer, gradually add the eggs one at a time and beat for 2 minutes or until a smooth dough forms.
    Prepare the oil in the pan.
    Put the pastry in a piping bag attached with a star-shaped nozzle and pipe 10 cm lengths of the pastry into oil, in batches, using scissors to snip the lengths.
    Cook for 3 to 4 minutes or until golden brown, drain on absorbent paper and toss in the cinnamon sugar to coat.
    Serve the churros dipped into the chocolate sauce.
    Enjoy!


    Saturday, August 11, 2012

    Porcini Risotto


    A whiff of the dried porcini will send me to well almost there.....Heaven. It is one of many God's gift to earth. Prized as an ingredient in various foods, Porcini is an edible mushroom held in high regard in many cuisines, and is commonly prepared and eaten in soups, pasta, stews, and risotto. Although it is sold commercially, it is very difficult to cultivate. Hence its high price.

    In Singapore, you can buy them in specialty food stores or specialty vegetable store in Tekka Market. Just a small amount like 50g will be able to feed 6. It will cost you less than S$10 for the porcini. You have to pay around S$25 for a plate of risotto with porcini in an Italian restaurant! I always have it in my fridge and I can whip up a gourmet Italian dinner in less than an hour.

    Next, the rice. For risotto, you can use Arborio (pronounced ar-boh-ree-oh) rice. Arborio rice comes from Italy. Its short, fat grains have a hard starchy center and a soft starchy shell. When cooked, the soft shell produces creaminess while the center remains crunchy.

    The stock is also very important. Arborio rice can absorb copious amount of stock, just get ready a big pot of stock to cook risotto.

    For 6
    Ingredients
    30 to 40g dried Porcini mushrooms
    370 ml boiling water
    300g Aborio Rice
    2 1/2 litres of chicken stock
    125 ml white wine
    2 big brown onions, chopped
    4 cloves of garlic, chopped
    2 boneless chicken thighs, cut to bite sizes
    100g of smoked ham pieces, cut to small pieces
    3 to 4 tbsp of olive oil
    Pepper and sea salt to taste
    Grated Parmesan cheese to serve

                                        
    Method
    Wash the porcini mushroom, soak them in boiling water for 15 minutes.

    You can use ready made stock or boil 2 1/2 litres of water and throw in 2 chicken cubes. The pot of stock must be constantly simmering when you are cooking the risotto.

    After 15 minutes, strain and reserve the precious soaking liquid and finely chop the Porcini into small pieces and set aside.

    In a big pot, heat the olive oil, add big onions and garlic and fry till soft.

    Add chicken, ham and pepper and cook till chicken change colour. Add the rice and cook, stirring for 2 minutes.
                                 
      Add the wine and continue to cook for another 2 minutes or until absorbed. Now add the reservedsoaking liquid, stir and let it absorb. Pour in the porcini mushrooms and stir through.

    Now add the chicken stock one big ladleful at a time, and cook, stirring continuously for 25 to 30 minutes or until liquid is absorbed and rice is al dente.

    Add more pepper and sea salt to taste.

    Serve with grated Parmesan cheese on top of the risotto.


    Sunday, August 5, 2012

    Cinnamon Rolls

    I love anything cinnamon. The cinnamon craze many years ago has died down in Singapore and you could hardly find any stand alone cinnamon rolls bakery here. So I have to make my own if I want to eat any. After trying out a few recipes, I am quite happy to settle for Laura in the Kitchen's. It is simple and straight forward. I have just made a big batch for my son's rugby team mates.


    Recipe adapted from Laura In The Kitchen
    Ingredients
    Makes 20 Rolls
    2 tsp Instant Yeast
    50g sugar
    60ml luke warm water

    180ml milk
    ¼ tsp of vanilla extract, optional
    1 egg
    1 tsp salt
    57g unsalted butter, melted
    500g of All Purpose Flour
    20g melted butter, to brush over the top before baking

    For the filling,
    75g unsalted butter, at room temperature
    155g brown sugar
    50g sugar
    1 1/2 Tbsp of ground cinnamon

    For the glaze,

    60g icing sugar
    ½ tsp of vanilla extract
    2 Tbsp  milk

    Method

    1) In a small bowl, combine the warm water and 1 tsp of the sugar (from the 50g), sprinkle the yeast over the top and let it sit for about 5 minutes or till it foams.
    2) In the bowl of a standing mixer fitted with a dough hook, mix the egg, milk, salt, remaining sugar and melted butter. Add 250g of the flour slowly, vanilla extract and yeast mixture, mix until its all incorporated and scrape down the sides. Slowly add about 250g more of flour and scrape down the sides again. Turn the speed up to medium and let it mix for about 5 to 7 minutes or until you have a very smooth dough.


    3) Oil a large bowl with some butter or oil and set aside. Take the dough out of the mixer and pull it together with your hands to form a ball, flouring your hands if the dough is sticky. Place it in the oiled bowl and oil all sides of the dough. Cover with plastic wrap and place it in a warm spot to rise for about 1 1/2 hours.
    4) In a small bow, mix together the brown sugar, sugar and cinnamon for the filling, set aside.
    5) After 1 1/2 hours, or when doubled in size, punch the dough down and roll it out onto a floured surface into a 40x25 cm rectangle. The dough is soft, smooth, stretchy and non sticky.


    6) Spread by brushing the soft butter over the top and sprinkle evenly over the sugar and cinnamon mixture. Brush the sides with some milk.


    7) Staring from one of the long ends, tightly roll the dough into a jelly roll form. Cut into 18 to 20 slices (make sure they are even) and place them cut side down in a well buttered 23x33 cm baking pan with sides. Cover with plastic wrap and let put them back into a warm spot to rise for another 1 hour.


    8) Half an hour before baking, preheat your oven to 180 degrees C.


    9) Once risen, brush them with some melted butter and bake them for about 25 to 30 minutes or until golden brown. Watching it and if it turns brown before the 25 minutes, cover it with a piece of foil to prevent burning. It is cooked if you insert a toothpick and it comes out clean. It will also sound hollow if you tap it with a fork. You can now eat it while it is nice and warm or you can glaze it.


    10) This step is optional. While the cinnamon rolls cool. Make the glaze. Mix the vanilla extract with the icing sugar for the glaze in a bowl, slowly add the milk until you get a runny glaze consistency by stirring with a spoon. Spoon the glaze over the cinnamon rolls by drizzling it diagonally across the rolls and enjoy!

    Thursday, August 2, 2012

    French Provencal roast chicken with 40 cloves of garlic (Poulet aux 40 Gousses d'Ail)

    I first ate this dish in one of the rustic French restaurant in Singapore. I fell in love with it. This dish is simple, straightforward without fancy ingredients, yet packed with flavour and is very satisfying. The name of the dish which really uses forty cloves of garlic certainly sound like a lot, but slow cooking mellows and caramalises the garlic to a creamy sweetness.


    Don't be scared off with the number of cloves of garlic, you will definitely not have strong garlic breath after eating as well. Garlic cloves are nutty and mellow when cooked whole. Once you try this dish, you may say that forty cloves are not enough and end up adding even more garlic, because they are so delicious.

    Chicken with 40 cloves of garlic is traditionally baked or cooked in an earthenware dish. So at home, I used the claypot to cook this dish and simmer it over a low fire. You can really taste the wine and the sweetness of the onions and garlic in the sauce. Serve with good bread. Heavenly!

    Ingredients
    1 big chicken, approx 1.6 kg
    40 cloves of garlic
    1 big onion, cut to quarters
    1/2 to 3/4 cup white wine
    1 cup chicken stock
    2 bay leaves
    3 sprigs of thyme
    salt & pepper to taste
    oil
    Method
    Boil a kettle of water to scald the 40 cloves of garlic for easy removal. After a couple of minutes, and viola, the skins of the garlic are easy peasy to peel.
    Cut the chicken into big pieces. Put some oil in a shallow pan and fry the pieces till golden brown. Dish up and set aside. Do not discard the remaining oil yet.
    In a big claypot, arrange half the chicken on the bottom, then stack with half the garlic pieces, half of the amount of onion pieces. one bay leaf and some thyme leaves. Layer again with the other half of the chicken pieces, onion, garlic and the herbs.
    Pour in the white wine and chicken stock.
    Cover and bring to boil in a medium heat.
    When the stock boils, bring the heat to low and slowly simmer for one and a half hours.
    Season with salt and pepper.Serve with a good crusty bread and a salad.


    Sunday, July 29, 2012

    Wonton noodles topped with Dried Shrimp Roe


    I went to Hong Kong for an annual eating spree recently and came back with some Dried Shrimp Roe.
    Dried Shrimp Roe is a Chinese condiment made by salt-curing the eggs of prawns before they hatch. I suppose they are considered a semi-delicacy in Hong Kong and they impart a salty umami-rich seafood flavour to whatever food they are sprinkled on. The Dried Shrimp Roe can last quite a long time as long as you keep them refrigerated. They are also not very expensive.


    The dried Shrimp Roe can be used as a condiment in wonton noodles, either they are mixed into the noodle dough before the noodles are dried and release their taste when the noodles are boiled or simply sprinkled or scattered on the cooked noodles. They are also sometimes cooked with bean curd or vegetables. ‘Ha-Zi’ is Dried shrimp Roe in Cantonese.
    It is like Bottarga which is a salt-cured fish roe from Sardinia or Karasumi, the Japanese version of Bottarga. For this Dried Shrimp Roe, all you need to do is to dry fry any amount in a pan until you can smell the fragrance and they are ready to use.
     
    Some of my friends have requested for this dish to be put on the blog when I posted a picture of my home made wonton noodle on the facebook. I hesitated to write about this, not because I do not want to share the recipe. We simply cannot buy any dried shrimp roe in Singapore. I have tried looking for it in some of the dried sea food wholesale shops but to no avail. The people there have not even heard of it.
    So, when my good friend, S told me she was going to Hong Kong, I jumped at  the chance to ask her to get some more for me. She was so sweet to hunt them down for me. Thank you my dear friend S.

    I plan to put some on pasta the next round and I think it might just work.


    To serve 6
    Ingredients:
    36 Wonton skin
    250g Mince pork
    200g prawns, peeled, cut in half and reserve shells and heads
    6 rounds of fresh wonton noodles
    Small bunch of choy sum, washed
    A few strands of chinese yellow chives, finely cut
    2 to 3 tsp light soy sauce
    5 to 6 shallots, sliced
    6 tbsp oil
    4 1/2 tbsp oyster sauce
    Pepper
    6 tsp Dried Shrimp Roe
    Method:
    Dry fry shrimp roe till fragrant and set aside.

    Put 2 to 3 tsp of soy sauce and a few dashes of pepper to marinade mince pork. Mix well

    Add in cut prawns and mix. set aside.

    Fry the cut shallots in the oil till it is lightly browned. Separate the shallots and the oil. The shallots are to top the noodles and the oil is for mixing with the noodles.

    Boil a big pot of water for cooking the noodles.

    Get ready a big basin of cold water for dunking in the cooked noodles.

    While the water is boiling, put 1 or 2 tsp of meat mixture onto the wonton skins to make wontons.

    You can make prawn flavoured soup to be served with the wonton noodles by boiling a small pot of water with the prawn shells and head, add some salt and pepper. (this soup is optional)

    Take out 6 serving plates and on each plate put in 3/4 tbsp of oyster sauce, 1 tbsp of shallot oil and dashes of pepper. Use a spoon to mix well.

    Scald the vegetables when the big pot of water is ready. Dish up the vegetables and set aside.

    Now cook the wontons, when the wontons float up, it is an indication that it is cooked. If you find it time consuming, cook it in another small pot on another flame simultaneously with the vegetables.

    In the same pot of boiling water after cooking the vegetables, cook the 1 round of noodles at a time. The noodles need to be cooked for just 1 minute or to your liking of doneness. I like mine with some bite.

    When the noodles are cooked, dunk it in the basin of cold water for a few seconds to stop it from cooking.

    Then put it back into the pot of boiling water to heat up for 1 to 2 seconds. Drain thoroughly and immediately put it in the plate of mixed oyster sauce and oil mixture and using a pair of chopsticks or tongs to mix the sauce well with the noodles.

    Put 5 to 6 cooked wontons and some vegetables on the side of  the noodles on each plate,  sprinkle 1 tsp of prepared Dried Shrimp Roe all round on the noodles and topped with some fried shallots.

    Do likewise for each plate and serve noodles with a small bowl of prawn flavoured soup.

    Not many places in Singapore sell this kind of noodles.

    Sunday, July 22, 2012

    Japanese Stewed Pork Belly (Buta No Kakuni)

    Buta No Kakuni is Japanese Pork Belly Stew. I want this to be a one dish meal eaten with Japanese rice in a single bowl. The pork belly is very tender with a tinge of sweetness from the sauce and melt in the mouth sensation. It is different from the Chinese "tau yew bak".
                      

    Ingredients:
    1.5kg pork belly
    1 big knob of ginger, grated or minced
    Some spring onion, cut to 2 inches long
    2 to 3 tbsp thick black soy sauce
    1/2 cup to 3/4 cup Japanese Sake
    3 to 4 tbsp Mirin
    5 tbsp sugar
    1 tbsp garlic, chopped
    Dashi, (using to bonito flakes), enough to cover the pork belly in the pot
    Method:
    Fill a large pot of water enough to cover the pork belly. Bring to boil and add the pork belly whole.

    When the outside of the pork belly turns white, about 1 to 2 minutes, remove the pork and pour away the water in the pot.

    Rinse pork belly and pat dry with paper towel.

    Cut pork belly into large squarish pieces.

    Fill the pot with the dashi, add pork belly, spring onion, ginger, garlic, sugar, sake and mirin.

    When it is boiled, turn down the flame and put a kanibuta (foiled alluminium lid touching the pork) and simmer for 1 to 1 1/2 hour till caramalised and tender.

    Serve with Japanese rice, spoon over sauce, boiled choy sum with oyster sauce & shallots, stir fried enoki mushrooms and sprinkle boiled edamame beans and seaweed on top.

    Monday, July 9, 2012

    Very simple Homemade Ricotta Cheese

    I need to make Ravioli, and I would like the filling to have bacon and Ricotta cheese. Buying Ricotta cheese for me is such a hassle. Need to go to certain supermarkets that sell, and sometimes they run out of stock and I got to run all over the place to look for it. Anyway it is expensive to the boot!
    I have made Ricotta cheese at home before after I saw the Donna Hay 10th birthday issue (Oct/Nov 2010), but just did not blog about it.
    It costs a fraction of the price from the store bought kind and it certainly taste much better without any preservatives. Really simple to make too without much effort and not troublesome at all. The good thing is I don't need to get out of the house.
    So this is the second time I am making Ricotta cheese using the recipe from Donna Hay. I like this recipe because it uses both milk and cream which gives it a very good taste. I also like the fact that it uses lemon juice. Some recipes use a whole gallon of milk only and some use vinegar which I guess will not taste as good as lemon juice.
    This recipe really taste good and it makes just a small amount.  


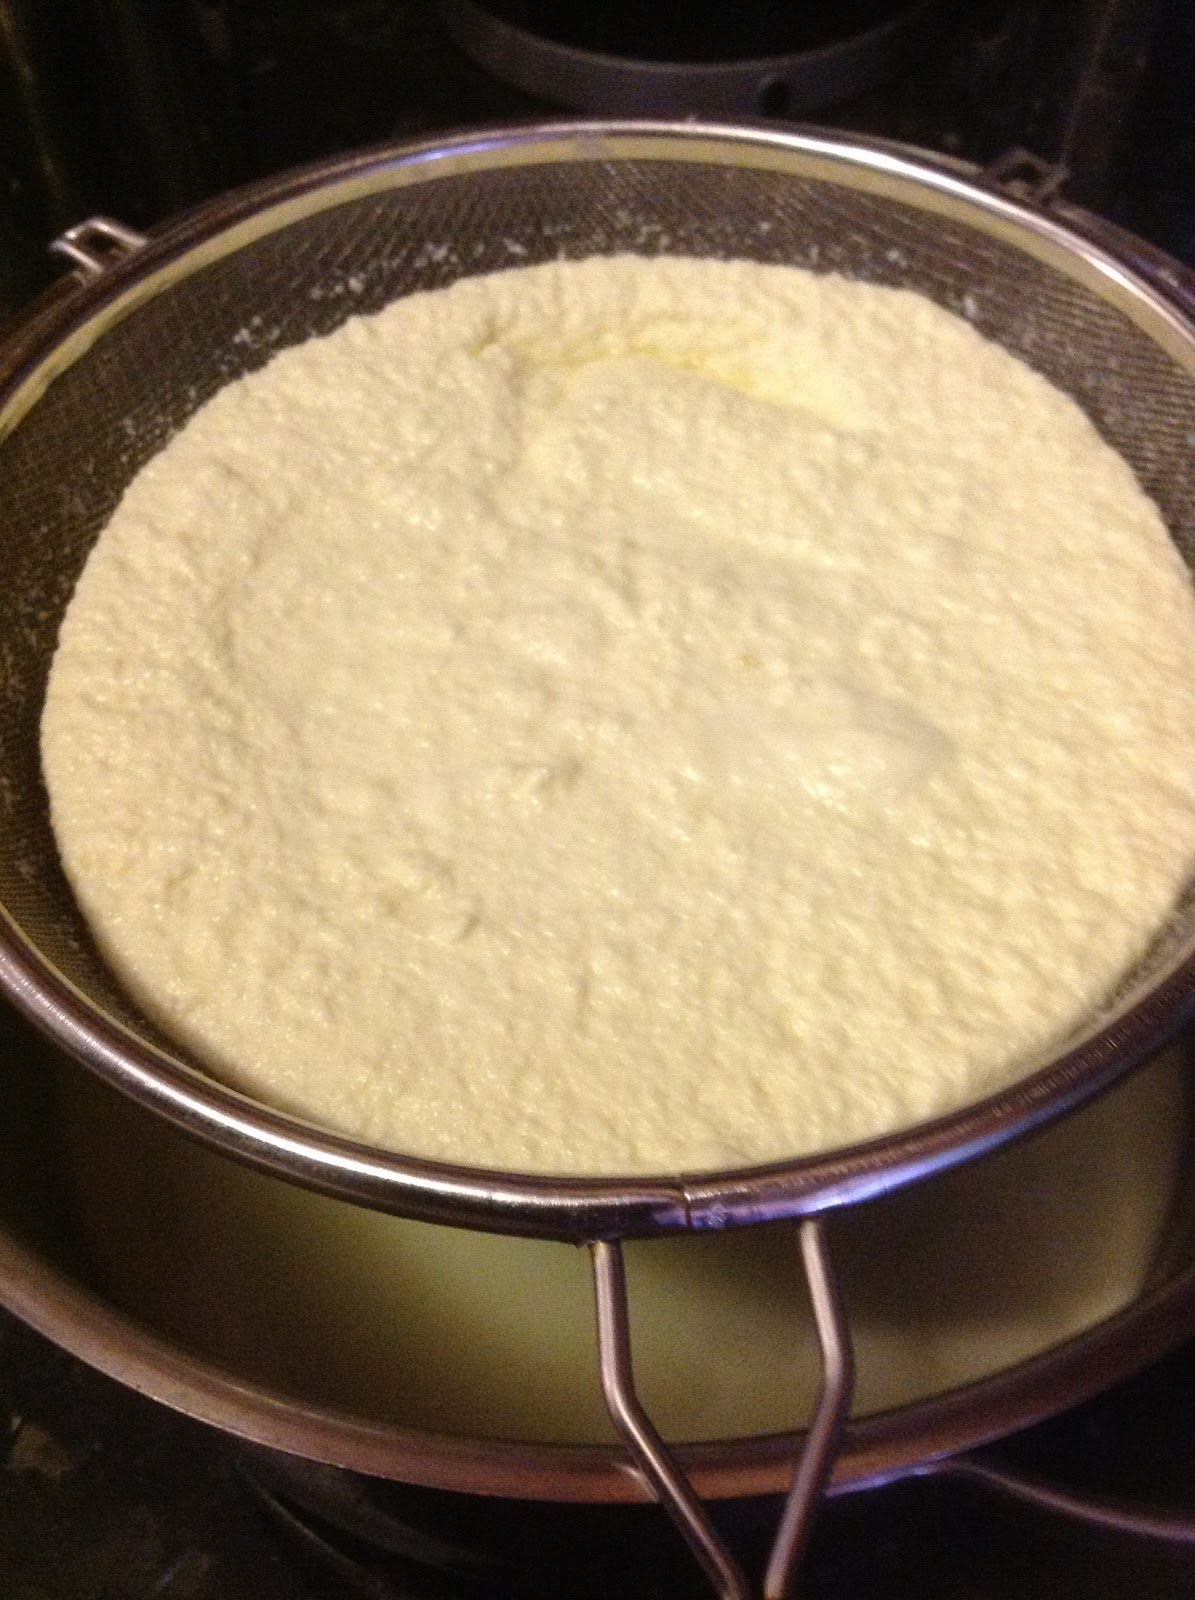
    I didn't even bother about using cheese cloth because I don't have any. I just used my big sieve with a fine mesh. It works pecfectly fine.
    Ingredients:
    Adapted from Donna Hay Magazine
    3 cups (750 ml ) milk
    1 cup (250 ml) double cream
    1/2 tsp sea salt
    2 - 3 tbsp lemon juice
    Method:
    Line a sieve with cheese cloth or muslin and place over a large bowl, or just use a fine mesh sieve.

    Heat the milk, cream and salt in a medium saucepan over high heat and bring to boil, stirring continuously.

    When it boils, turn down the flame and let it just bubble a little.

    Add 2 tbsp of lemon juice and stir.

    Let it curdle but if it is not curdling so well, add another tbsp of lemon juice to it and it will do the job.

    Let it boil for a couple of minutes more and remove the pan from the heat and allow to stand for 5 minutes.

    Pour the milk mixture into the prepared sieve and set aside at room temperature for 1 hour to strain the whey out.

    Shake and move the sieve now and then to make sure all the whey flows out and the curds are dry.

    Make sure the curds are cool and place the Ricotta cheese in an airtight container in the fridge until required.

    Makes more than a cup.

    You can either discard the whey at the bottom of the bowl or you can use it to bake bread.

    I always make plain white bread with the leftover whey and the bread tastes great!


    Sunday, July 8, 2012

    Claypot Chicken Rice

    After a long hiatus, I have decided to be back. I have been cooking a lot these days, not as much as I want to but good for a restart.
    One of my favourite place (Tong Chiang Hakka Cuisine in Lavender street) for claypot rice has closed or rather taken over by another person and the cook has left too. They still sell the dish but what a world of difference, it simply do not taste the same. The name of the eating place remains the same but they don't sell Hakka Food at all! What a shame!
    So I decided to cook my own and replicate the flavour of the dish. So here it is.
                      
    For 6 persons
    Ingredients:
    4 cups of rice - washed and dry
    1 whole chicken - cut into pieces
    2 lap cheong (Chinese sausages) - sliced diagonally into thin pieces
    1 liver sausage (optional) - do likewise as above
    1 lap yoke (Chinese flat preserved meat) optional - sliced thinly
    2 pieces of dried scallops
    8 pieces of dried Shitake mushrooms - washed and soaked in hot water (reserve liquid) - sliced
    1 thumb size piece of salted fish - cut
    6 stalks of choy sum
    salt
    4 cloves garlic - chopped
    10 shallots - sliced (5 pieces for cooking and 5 pieces for crispy shallots and oil)
    2 tsp chicken seasoning powder or 1 stock cube
    water/chicken stock without salt
    chicken oil - optional
    Marinade:
    1 1/2 tsp dark soya sauce
    1 tbsp oyster sauce
    5 tsp of ginger juice
    Method:
    Prepare the 5 pieces of sliced shallots for frying it till crispy and keep the oil for later use.

    Marinade chicken pieces with ginger juice, oyster sauce, dark sauce and pepper.

    In a pan, put oil and fry the salted fish till fragrant and dish out and put aside.

    Fry the rest of sliced shallots, garlic in the remaining oil and add more chicken oil if using.

    Add the rice grains to the fragrant oil and fry well. Add chicken powder/stock cube, pepper and salt to taste.

    Fry a few minutes till well mixed. Scoop rice into the claypot.

    Measure reserved mushroom water and additional water/stock to exactly 4 cups of liquid and pour into the claypot of rice. Cover the claypot and put a damp towel around it if necessary.

    Simmer rice till dry, add marinated chicken pieces, Chinese sausages, liver sausage, flat preserved meat, mushrooms, salted fish and vegetables.

    Cover and simmer for another 20 minutes or more.

    Taste the rice, it might need more time to cook till the rice and chicken to be soft.

    When the rice is ready, serve the whole pot to the dining table. Uncover and scoop all the ingredients except the rice onto the cover.

    Using a rice scoop, mix the rice thoroughly with more dark soya sauce and the reserved shallot oil.

    Put the ingredients back into the pot and mix with rice again.

    Serve with crispy shallots and chilli sauce.

    PS: the rice crust that is stuck around the claypot is the highlight - crispy and delicious!
                       
    Related Posts Plugin for WordPress, Blogger...