Translate
Sunday, July 29, 2012
Wonton noodles topped with Dried Shrimp Roe
I went to Hong Kong for an annual eating spree recently and came back with some Dried Shrimp Roe.
Dried Shrimp Roe is a Chinese condiment made by salt-curing the eggs of prawns before they hatch. I suppose they are considered a semi-delicacy in Hong Kong and they impart a salty umami-rich seafood flavour to whatever food they are sprinkled on. The Dried Shrimp Roe can last quite a long time as long as you keep them refrigerated. They are also not very expensive.
The dried Shrimp Roe can be used as a condiment in wonton noodles, either they are mixed into the noodle dough before the noodles are dried and release their taste when the noodles are boiled or simply sprinkled or scattered on the cooked noodles. They are also sometimes cooked with bean curd or vegetables. ‘Ha-Zi’ is Dried shrimp Roe in Cantonese.
It is like Bottarga which is a salt-cured fish roe from Sardinia or Karasumi, the Japanese version of Bottarga. For this Dried Shrimp Roe, all you need to do is to dry fry any amount in a pan until you can smell the fragrance and they are ready to use.
Some of my friends have requested for this dish to be put on the blog when I posted a picture of my home made wonton noodle on the facebook. I hesitated to write about this, not because I do not want to share the recipe. We simply cannot buy any dried shrimp roe in Singapore. I have tried looking for it in some of the dried sea food wholesale shops but to no avail. The people there have not even heard of it.
So, when my good friend, S told me she was going to Hong Kong, I jumped at the chance to ask her to get some more for me. She was so sweet to hunt them down for me. Thank you my dear friend S.
I plan to put some on pasta the next round and I think it might just work.
To serve 6
Ingredients:
36 Wonton skin
250g Mince pork
200g prawns, peeled, cut in half and reserve shells and heads
6 rounds of fresh wonton noodles
Small bunch of choy sum, washed
A few strands of chinese yellow chives, finely cut
2 to 3 tsp light soy sauce
5 to 6 shallots, sliced
6 tbsp oil
4 1/2 tbsp oyster sauce
Pepper
6 tsp Dried Shrimp Roe
Method:
Dry fry shrimp roe till fragrant and set aside.
Put 2 to 3 tsp of soy sauce and a few dashes of pepper to marinade mince pork. Mix well
Add in cut prawns and mix. set aside.
Fry the cut shallots in the oil till it is lightly browned. Separate the shallots and the oil. The shallots are to top the noodles and the oil is for mixing with the noodles.
Boil a big pot of water for cooking the noodles.
Get ready a big basin of cold water for dunking in the cooked noodles.
While the water is boiling, put 1 or 2 tsp of meat mixture onto the wonton skins to make wontons.
You can make prawn flavoured soup to be served with the wonton noodles by boiling a small pot of water with the prawn shells and head, add some salt and pepper. (this soup is optional)
Take out 6 serving plates and on each plate put in 3/4 tbsp of oyster sauce, 1 tbsp of shallot oil and dashes of pepper. Use a spoon to mix well.
Scald the vegetables when the big pot of water is ready. Dish up the vegetables and set aside.
Now cook the wontons, when the wontons float up, it is an indication that it is cooked. If you find it time consuming, cook it in another small pot on another flame simultaneously with the vegetables.
In the same pot of boiling water after cooking the vegetables, cook the 1 round of noodles at a time. The noodles need to be cooked for just 1 minute or to your liking of doneness. I like mine with some bite.
When the noodles are cooked, dunk it in the basin of cold water for a few seconds to stop it from cooking.
Then put it back into the pot of boiling water to heat up for 1 to 2 seconds. Drain thoroughly and immediately put it in the plate of mixed oyster sauce and oil mixture and using a pair of chopsticks or tongs to mix the sauce well with the noodles.
Put 5 to 6 cooked wontons and some vegetables on the side of the noodles on each plate, sprinkle 1 tsp of prepared Dried Shrimp Roe all round on the noodles and topped with some fried shallots.
Do likewise for each plate and serve noodles with a small bowl of prawn flavoured soup.
Not many places in Singapore sell this kind of noodles.
Sunday, July 22, 2012
Japanese Stewed Pork Belly (Buta No Kakuni)
Buta No Kakuni is Japanese Pork Belly Stew. I want this to be a one dish meal eaten with Japanese rice in a single bowl. The pork belly is very tender with a tinge of sweetness from the sauce and melt in the mouth sensation. It is different from the Chinese "tau yew bak".
Ingredients:
1.5kg pork belly
1 big knob of ginger, grated or minced
Some spring onion, cut to 2 inches long
2 to 3 tbsp thick black soy sauce
1/2 cup to 3/4 cup Japanese Sake
3 to 4 tbsp Mirin
5 tbsp sugar
1 tbsp garlic, chopped
Dashi, (using to bonito flakes), enough to cover the pork belly in the pot
Method:
Fill a large pot of water enough to cover the pork belly. Bring to boil and add the pork belly whole.
When the outside of the pork belly turns white, about 1 to 2 minutes, remove the pork and pour away the water in the pot.
Rinse pork belly and pat dry with paper towel.
Cut pork belly into large squarish pieces.
Fill the pot with the dashi, add pork belly, spring onion, ginger, garlic, sugar, sake and mirin.
When it is boiled, turn down the flame and put a kanibuta (foiled alluminium lid touching the pork) and simmer for 1 to 1 1/2 hour till caramalised and tender.
Serve with Japanese rice, spoon over sauce, boiled choy sum with oyster sauce & shallots, stir fried enoki mushrooms and sprinkle boiled edamame beans and seaweed on top.
Monday, July 9, 2012
Very simple Homemade Ricotta Cheese
I need to make Ravioli, and I would like the filling to have bacon and Ricotta cheese. Buying Ricotta cheese for me is such a hassle. Need to go to certain supermarkets that sell, and sometimes they run out of stock and I got to run all over the place to look for it. Anyway it is expensive to the boot!
I have made Ricotta cheese at home before after I saw the Donna Hay 10th birthday issue (Oct/Nov 2010), but just did not blog about it.
It costs a fraction of the price from the store bought kind and it certainly taste much better without any preservatives. Really simple to make too without much effort and not troublesome at all. The good thing is I don't need to get out of the house.
So this is the second time I am making Ricotta cheese using the recipe from Donna Hay. I like this recipe because it uses both milk and cream which gives it a very good taste. I also like the fact that it uses lemon juice. Some recipes use a whole gallon of milk only and some use vinegar which I guess will not taste as good as lemon juice.
This recipe really taste good and it makes just a small amount.
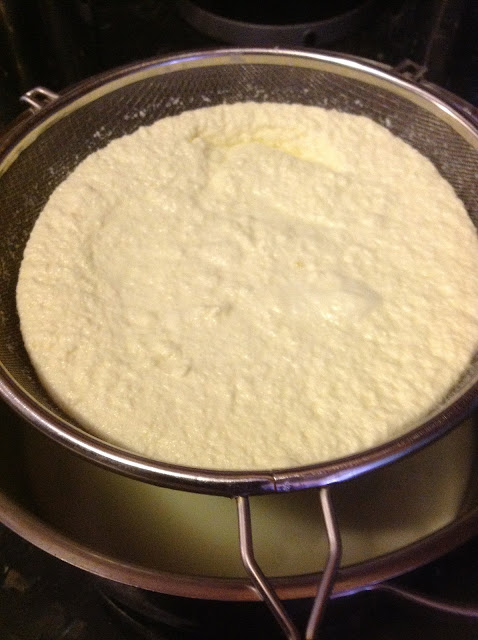
I didn't even bother about using cheese cloth because I don't have any. I just used my big sieve with a fine mesh. It works pecfectly fine.
Ingredients:
Adapted from Donna Hay Magazine
3 cups (750 ml ) milk
1 cup (250 ml) double cream
1/2 tsp sea salt
2 - 3 tbsp lemon juice
Method:
Line a sieve with cheese cloth or muslin and place over a large bowl, or just use a fine mesh sieve.
Heat the milk, cream and salt in a medium saucepan over high heat and bring to boil, stirring continuously.
When it boils, turn down the flame and let it just bubble a little.
Add 2 tbsp of lemon juice and stir.
Let it curdle but if it is not curdling so well, add another tbsp of lemon juice to it and it will do the job.
Let it boil for a couple of minutes more and remove the pan from the heat and allow to stand for 5 minutes.
Pour the milk mixture into the prepared sieve and set aside at room temperature for 1 hour to strain the whey out.
Shake and move the sieve now and then to make sure all the whey flows out and the curds are dry.
Make sure the curds are cool and place the Ricotta cheese in an airtight container in the fridge until required.
Makes more than a cup.
You can either discard the whey at the bottom of the bowl or you can use it to bake bread.
I always make plain white bread with the leftover whey and the bread tastes great!
Sunday, July 8, 2012
Claypot Chicken Rice
After a long hiatus, I have decided to be back. I have been cooking a lot these days, not as much as I want to but good for a restart.
One of my favourite place (Tong Chiang Hakka Cuisine in Lavender street) for claypot rice has closed or rather taken over by another person and the cook has left too. They still sell the dish but what a world of difference, it simply do not taste the same. The name of the eating place remains the same but they don't sell Hakka Food at all! What a shame!
So I decided to cook my own and replicate the flavour of the dish. So here it is.
For 6 persons
Ingredients:
4 cups of rice - washed and dry
1 whole chicken - cut into pieces
2 lap cheong (Chinese sausages) - sliced diagonally into thin pieces
1 liver sausage (optional) - do likewise as above
1 lap yoke (Chinese flat preserved meat) optional - sliced thinly
2 pieces of dried scallops
8 pieces of dried Shitake mushrooms - washed and soaked in hot water (reserve liquid) - sliced
1 thumb size piece of salted fish - cut
6 stalks of choy sum
salt
4 cloves garlic - chopped
10 shallots - sliced (5 pieces for cooking and 5 pieces for crispy shallots and oil)
2 tsp chicken seasoning powder or 1 stock cube
water/chicken stock without salt
chicken oil - optional
Marinade:
1 1/2 tsp dark soya sauce
1 tbsp oyster sauce
5 tsp of ginger juice
Method:
Prepare the 5 pieces of sliced shallots for frying it till crispy and keep the oil for later use.
Marinade chicken pieces with ginger juice, oyster sauce, dark sauce and pepper.
In a pan, put oil and fry the salted fish till fragrant and dish out and put aside.
Fry the rest of sliced shallots, garlic in the remaining oil and add more chicken oil if using.
Add the rice grains to the fragrant oil and fry well. Add chicken powder/stock cube, pepper and salt to taste.
Fry a few minutes till well mixed. Scoop rice into the claypot.
Measure reserved mushroom water and additional water/stock to exactly 4 cups of liquid and pour into the claypot of rice. Cover the claypot and put a damp towel around it if necessary.
Simmer rice till dry, add marinated chicken pieces, Chinese sausages, liver sausage, flat preserved meat, mushrooms, salted fish and vegetables.
Cover and simmer for another 20 minutes or more.
Taste the rice, it might need more time to cook till the rice and chicken to be soft.
When the rice is ready, serve the whole pot to the dining table. Uncover and scoop all the ingredients except the rice onto the cover.
Using a rice scoop, mix the rice thoroughly with more dark soya sauce and the reserved shallot oil.
Put the ingredients back into the pot and mix with rice again.
Serve with crispy shallots and chilli sauce.
PS: the rice crust that is stuck around the claypot is the highlight - crispy and delicious!
Subscribe to:
Posts (Atom)