Translate

Friday, December 14, 2012

Madeleine Classic


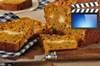
This is one of the bakes that I will quickly whip up if I am given a very short notice of friends coming for tea. Madeleines are very easy to prepare and taste very delicious. It is also classy and light. It takes just a short while to bake in the oven. We can put it into the oven to bake once our guests are seated. For less than ten minutes in the oven, our guests will have nice freshly baked madeleines.

The madeleine is a traditional small sponge cake from Commercy and Liverdun, in northeastern France. Madelenes have a distinctive shell-like or scallop shape acquired from being baked in pans with shell-shaped depressions.

The story in the 18th century goes that a girl name Madeleine made them for Stanislaw Lezczynski, Duke of Lorraine, who loved them so much that he then gave some to his daughter, Marie, the wife of Louis XV. Their popularity grew from that point on and enjoyed round the globe.
A genoise cake batter is used. The flavour is similar to, but somewhat lighter than, sponge cake. Some traditional recipes include very finely ground almonds. A variation uses lemon zest, for a pronounced lemony taste.

Traditional madeleines have a big bump on their backs. If you chill your batter, all the bigger the hump will be. But if you have no time to chill, bake it straight away and it will still taste the same, only with a smaller hump or bump.

Classic Madeleine
Makes about 24

Ingredients

95g (3/4 cup) plain flour
1/2 tsp double acting baking powder
2 large eggs
100g (1/2 cup) sugar
Grated zest of 1 lemon
2 tsp vanilla extract
120g (5 tbsp unsalted) butter, melted & cooled
Icing sugar for dusting

Method

Sift the flour and baking powder.
In a stand mixer, beat the eggs and sugar until light and fluffy. (Of course you can do it by hand)
Beat in lemon zest and vanilla extract.
Fold in the sifted flour mixture by hand.
Add in the melted butter. Mix until the butter is incorporated.
Cover with plastic wrap, pressing against the surface of the batter and chill for 3 hours in the fridge.(This is optional if you have the time plus if you want a big bump on the back of your madeleines)
If not, you can bake it without chilling it.
The special technique for baking madeleines and for getting a big bump on their backs is to combine hot and cold.
Center a rack in the oven and put a baking sheet (hot) on the rack and preheat the oven to 200 C (400 F).
Spray the special madeleine pan with cooking spray or butter and dust with flour.


Fill pan with 3/4 full of chilled batter.
Bake the madeleines for 8 minutes on the very hot baking sheet or until the madeleines are golden and the tops spring back when touched.
Remove the pan from the oven and release the madeleines from the molds by rapping the edge of the pan against the counter. Gently pry the madeleines from the pan using your fingers or a butter knife. Transfer the cookies to a rack to cool for a while.
Dust with icing sugar and serve shell side up with tea or coffee.


Monday, November 26, 2012

Passion Fruit Soufflé

 
A soufflé is a lightly baked cake made with egg yolks and beaten egg whites combined with various other ingredients and served as a savory main dish or sweetened as a dessert. The main ingredients are mainly eggs. You can whip up this dessert in less than half an hour and it is such a light dessert with few calories.
 
The only set back is that you have to serve the souffle immediately straight from the oven. Soufflés are not supposed to be made in advance because when it comes out of the oven, a soufflé should be puffed up and fluffy, and it will generally fall or collapse after 5 or 10 minutes.
 
A soufflé is made from two basic components; a flavoured base and egg whites beaten to a soft peak meringue. The base provides the flavour and the whites provide the "lift".

To begin, for practice, this passion fruit soufflé is easy to make and taste really good.


Passion Fruit Soufflés

Adapted from Neil Perry
Ingredients

3 egg yolks
37 g + 37g Sugar
45 ml strained Passion Fruit Juice
3 egg whites
Salt
 
Method
 
You can use a mixer or hand whisk for this recipe.
Set the oven at 190 C.
In a bowl, or you can use a mixer, cream the egg yolks with the first 37g sugar, until pale and the sugar has dissolved.
Add the passionfruit juice, mix and set aside.
In a separate clean bowl or clean mixer bowl, whisk the egg whites with a tiny pinch of salt. 
When you are ½ way to peaks forming, add ½ the remaining sugar, followed by the rest shortly after.
Whisk to firm peaks but be careful not to overbeat them.
Fold 1/3 of the whites into the yolks then carefully fold through the remaining.
Spoon the mixture into a buttered and sugared soufflé mould or ramekin
Bake at 190C for 12 minutes.
Serve immediately with ice cream. (optional)
Makes about 8 to 9 small ramekins of soufflé.


Tuesday, November 13, 2012

PROFITEROLES: Choux pastry with Vanilla Bean ice cream topped with warm Valrhona chocolate sauce


I have been asked to make this for the longest time but I kept pushing it back as I was too lazy. I like to make everything from scratch and for this particular dessert means I have to make three items. Namely; Vanilla bean ice cream, choux pastry and chocolate sauce and not forgetting to toast the sliced almonds. That was the very reason I kept procrastinating.

After having lunch at Le Bistrot Du Sommelier with a friend, I was inspired to make this for my family. Their profiteroles are out of this world and I had to make this at home for my love ones.

These choux pastry are soft and light, sandwiched with the homemade cold Vanilla bean ice cream, topped with warm Valrhona thick chocolate sauce, sprinkle with some toasted almonds and icing sugar will definitely bring you straight to almost heaven!

Everyone was happy of course.

PROFITEROLES

Choux Pastry - 30 to 40 choux
Ingredients

150 ml water
125 ml milk
100 g unsalted butter
150g self raising flour
1 tsp salt
2 tsp sugar
5 eggs

Method
Preheat oven at 180 C with fan. (350 F)
Sift the flour and salt into a bowl.
Place the milk, water and sugar into a pan and set over a low heat.
Once the sugar and salt has dissolved add the butter.
As soon as the butter has melted, turn the fire up to bring to a rolling boil.
Turn down the fire to low heat then tip in all the flour and beat vigorously with a wooden spoon. As soon as the mixture starts to come away from the side of the pan and looks dry, stop beating and tip the mixture into the stand mixer.
On medium low speed, beat the mixture and let the steam escape.
Gradually beat in the eggs, one at a time, mixing well between each addition, until you have a smooth paste and is well incorporated.
At the end finish with high speed for a minute.
Line a baking sheet with greaseproof paper or silpat.
Spoon the choux pastry into a piping bag with a cut tip. (I did not use a piping nozzle, you can use if you want)
Now pipe 4 to 5 cm rounds (1 1/2 inches) onto the baking sheet, spaced it well apart. Level the peaked tops with the tip of a wet finger then bake for 180 C (350 F) for 15 minutes.
Turn up the temperature to 200 C ( 390 F) and continue to bake for another 5 to 7 minutes till golden brown. Cool on wire rack.


Warm Valrhona Chocolate Sauce
Ingredients

250 g Valrhona chocolate (55%) or any good dark chocolate - chopped if it is a big piece
150 g full cream milk

Method:
Boil the milk to a rolling boil. Turn the heat off
Immediately, add the chocolate pieces and stir till melted.
Keep warm, put the pot of sauce on a another pot of very hot water. (no fire please, bain marie) 
Alternatively, microwave to warm up the sauce for a 10 seconds shot each time on medium high heat. 

Vanilla Bean Ice Cream
You have to make this one day ahead.
Alternatively, you can buy good ice cream. I suggest Haagen Dazs if you have to buy.

To assemble PROFITEROLES
Cut the choux pastries into half.
Put two bottom pastries onto a dessert plate, fill one scoop of Vanilla ice cream (homemade or store bought, mine is homemade with 2 vanilla pods) onto each pastry.
Cover with the top pastries and spoon warm chocolate sauce onto the pastries generously.
Put a few toasted almonds onto the chocolate sauce and lastly sprinkle icing sugar on to the top of the pastries and serve immediately.
Enjoy!


Friday, October 26, 2012

Caramel Macadamia Nut Cookies


These cookies are one of the best tasting cookies I have ever baked! You can taste the caramel goodness and the sweetness is just right. The Macadamia nuts are crunchy and go very well with the caramel taste. At first the recipe looks like it is going to taste extremely sweet because it uses both light muscovado sugar and golden syrup. But hey! It is really just nice, believe me.

My daughter was at home, so she wanted all the fancy shaped cut outs. Or else I would just use plain old round cookie cutters.

They are considered luxe cookies and it is a real treat. I imagine I have a large glass cookie jar and fill it up to the brim. Let me warn you, it is really hard to just stop at one! Be prepared.


Caramel Macadamia Nut Cookies
Yields 35 to 40 large cookies

Ingredients
120 g unsalted butter, softened
150 g light Muscovado sugar
160g golden syrup

220g plain flour
1 tbsp bicarbonate of soda
1 tsp baking powder
1/2 tsp salt
150g ground almonds
80g Macadamia nuts, chopped

Sift the flour, bicarbonate of soda, baking powder and salt together.
Put butter and sugar in a stand mixer and cream till soft.
Add the golden syrup, beat the mixture until well combined.
Now add the ground almonds, beat well.
At a low speed, add the flour mixture to the creamed mixture, mixing until just combined.
Fold in the nuts by hand till evenly distributed.
Roll the dough in parts between cut out plastic sheets/bags to about 1/2 to 3/4 cm thick and put the dough in the fridge to chill for an hour, for ease of handling.
You might need to divide the dough into a few bags/sheets
Switch on oven to 180 C with fan mode.
Working with one sheet of dough at a time, (the rest of the dough remains in the fridge) remove the top piece of plastic, stamp out the dough using cookie cutter of about 5 to 6 cm in diameter.
Put on a lined baking sheet or tray, better yet use silpat if you have one.
Bake in batches for 10 to 12 minutes until golden. Cool on wire racks.


.

Sunday, October 14, 2012

Cupcake with Durian Mousse Frosting

It was my mom's Birthday, I was cracking my head on what kind of birthday cake to bake for her. Her favourite kind of cake is fruit based. She simply loves fruits. My whole family loves Durian and bingo, it shall be durian then!

I made it into cupcakes so that we did not need any plates and cutleries and therefore no washing up!
I was searching for recipes and adapted my cupcakes from two websites. (Joyofbaking & Munch Ministry) Put them in pretty cupcake liners, and added some fondant flowers to pretty them up.

Happy Birthday Mummy!


Durian Mousse Cupcake 

Vanilla Cupcake Recipe
Adapted from http://m.joyofbaking.com/cupcakes/VanillaCupcakes.html

Durian Mousse Frosting Recipe
Adapted from http://munchministry.com/recipe/durian-mousse-cake/


Sunday, October 7, 2012

Black Sesame and Bamboo Charcoal Chiffon Cake


The last round I made this cake, it tasted great but looks wise, it wasn't great. It turned out looking grey and dull, my friends commented it looked mouldy even. Of course it wasn't mouldy but the look turned him off and he refused to eat it.

I looked in the net and most of the black sesame cakes all look greyish and not black. Does it mean, I need to put colouring in the chiffon cake? No way! I like it black but I don't want to put in colouring. I would like a natural looking black cake without colouring. Just like the pandan chiffon cake with pure pandan juice that turns it green without colouring.

So I improvised and experimented and added in some bamboo charcoal powder. Yes! It looked much better this time round. It was black instead of grey and still has a strong sesame flavour. It was a hit with my family.


 Black Sesame & Bamboo Charcoal Chiffon Cake

Using a 23 cm Chiffon cake  tube pan
Ingredients

Cake batter
100g Plain Flour/Top Flour
7 Egg yolks
30g Brown sugar
40g Black Sesame powder or paste
85g Water
60g Canola Oil
30g Black Sesame seeds (you can use white sesame seeds)
14g Bamboo Charcoal powder

Meringue
7 Egg whites
125g Castor sugar
14g Corn flour
1/4 tsp Cream of tartar

Method
Preheat oven to 160 C.
Sift the flour.
Put egg yolks, brown sugar, black sesame powder/paste and bamboo charcoal powder in the mixing bowl and mix well until sugar is dissolved.
Add water and canola oil and mix well, making sure it is well blended.
Add flour and mix till batter turns sticky, then fold in sesame seeds. Put aside.

Making the Meringue
Using the mixer with the whisk attachment, put the egg whites in the bowl and beat it until it is foamy.
Add the cream of tartar, half of the castor sugar and half of the corn flour and continue to beat for a few minutes.
Then add the remaining sugar and corn flour and beat till egg whites are smooth and glossy and with stiff peaks. Taking care not to over beat it. Checking it in every few strokes.
Using a spatula, add one third of the meringue into the egg yolk mixture and fold in very lightly, then add in the rest of the meringue and fold to incorporate completely. Do not over mix as the sesame paste in the mixture will cause the air bubbles in the meringue to deflate, thus making it heavy.
Pour batter into an ungreased chiffon cake tube pan. Bake for 50-60 minutes.
When cake is done, remove from the oven and turn the pan over on a rack leaving it to cool completely.
When it is cooled, turn it back up and using a knife, go round the pan to remove the cake from the pan.
Chiffon cake tube pan with legs. Turn it upside down like that when cooling the cake.


Stiff peaks, smooth and glossy.


Sunday, September 30, 2012

Plum Cake with Burnt Brown Butter

 
 Plums were cheap in the supermarket yesterday. They were going for S$1.55 for 6. Grabbed some immediately and my thoughts went to Limoncino or rather Limoncello Plum Tart that I made quite some time ago for a friend.

Sunday is usually a bake day or a cook day for me. I planned to start the morning with Buttermilk Blueberry Pancakes, then set the dough to rise for a Sourdough Bread, bake a Limoncello Plum tart and then Roast Pork. All the ingredients were fine and in order except that I discovered that my remaining cream in the carton went sour! Oh no! I need cream in the Limoncello Plum Tart! I was too lazy to drive a few kilometres to the shops to get cream. I will not make do without the cream.

So I had to get on the net to see what I can make out of the plums. I came across Dinner with Julie's Brown Butter Bliss. It uses plums and I had all the ingredients and look very easy to whip up. It was a custardy batter quickly poured over plums and baked to a crusty gold. This recipe is very good for beginners, almost foolproof. In fact, you can use up any fruits for this recipe. I am glad I found it.

It is a pity that my Limoncello Plum Tart has to wait again. Well, the cake was nice, best serve warm with a dollop of vanilla ice cream.


Plum cake with Burnt Brown Butter
Adapted from Dinner With Julie

Ingredients

6 plums, thickly sliced
168g (3/4 cup) + 2 Tbsp. sugar (or to taste, according to the sweetness of the fruit)
1/2 tsp. ground cinnamon

1/2 tsp ground nutmeg
125g (1/2 cup) butter
2 large eggs
225g (1 cup) plain or all purpose flour, sifted


Method

Preheat the oven to 180 C (350°F) and grease and line an 20 cm (8 inch) cake pan.
Toss the fruits in a bowl  with about 2 Tbsp sugar, the ground cinnamon and the nutmeg then spread onto the cake pan.
Melt the butter in a small saucepan and keep stirring it, swirling the pan occasionally, for about 5 minutes or until it turns golden.
Pour  the burnt butter into a the mixer. Turn it on medium speed.
Mix the 3/4 cup of sugar into the butter, let the sugar dissolve in the mixture.
When the most of the sugar has dissolved and the mixture is cooler, add the eggs and mix thoroughly.
Then add the flour at the lowest speed. Just mix until even.
Pour the mixture over the fruits in the cake pan.
Bake for 40-45 minutes, until golden and crusty, and the juices ooze from around the edges. Serve warm with vanilla ice cream, whipped cream or thick vanilla yogurt.
Serves 8.


While I am finishing up for this blog, I can smell the heavenly Roast Pork in the oven. Can't wait!


Tuesday, September 25, 2012

Blue Velvet Cupcakes with Blueberries

After the hassle and the acquiring of the new IPhone 5, I can at last do some writing and posting on this blog. Last week my good friend S mentioned that her daughter and her friends have never seen any Blue Velvet Cakes in Singapore and wonder how it would look and taste like. So to make them happy, I made some for them.

I followed the recipe for the Red Velvet Cupcake and added some fresh blueberries to the cupcakes. Everything else remains the same. It is not easy getting the right kind of colour for this Blue Velvet Cupcakes. Too little colouring, the batter will have a tinge of green, too much of it will turn it dark blue. I read somewhere that you need to add violet colour to it, so mine turned a bit too dark. I will not add any violet colouring the next round.

This recipe is straightforward and resulted in a really velvety and delicious tender sponge and the frosting is good with the correct level of sweetness. It is suitable for both adults and children.


Blue Velvet Cupcakes with Blueberries


 60 g (1/4 cup) unsalted butter (room temperature)
150 g (3/4 cups) sugar
1 egg
1/2 tsp vanilla extract

125 g (1 1/4 cups) cake flour, sifted
1/4 tsp baking powder
1/4 tsp salt
10 g (1 tbsp) regular or Dutch-processed cocoa powder
120 ml (1/2 cup)  buttermilk
1 tbsp liquid blue food colouring
1/2 tsp white vinegar
1/2 tsp baking soda
100g fresh blueberries
2 tsp blue sanding sugar (optional)

Cream Cheese Frosting:
227 g (8 oz) cream cheese, room temperature
1/2 tsp vanilla extract
60 grams (1/2 cup) icing (confectioners') sugar, sifted
160 ml (2/3 cup) cold whipping cream
 
 
Method

Preheat oven to 175 degrees C (350 degrees F) and line 12 muffin tins with paper cupcake liners.

In a bowl, sift the flour, baking powder, salt and cocoa powder.
Beat the butter for 2 minutes in an electric mixer until soft. Add the sugar and beat until pale and fluffy. Add the egg and beat until incorporated. Scrape down the bowl. Add the vanilla extract and beat until combined.
In a smaller bowl, whisk the buttermilk with the blue food colouring. With the mixer on the smallest speed, alternately add the flour mixture and coloured buttermilk to the butter mixture, in three additions, beginning and ending with the flour.
In a small cup, combine the vinegar and baking soda. Allow the mixture to fizz up and then quickly fold into the cake batter.
Working quickly, divide the batter evenly among the 12 muffin lined cups (about 2/3 full) and smoothen the top of the batter. Add in a few fresh blueberries on the top of the batter, push the fruits down. Bake in the preheated oven for approximately 20-25 minutes, or until a toothpick inserted in the center of the cupcakes comes out clean.
Cool the cakes on a wire rack. Let cool completely before frosting. Use a large 1M Wilton open star decorating tip to pipe the frosting. Sprinkle blue sanding sugar to decorate.
Cream Cheese Frosting
In the bowl of your electric mixer, beat the cream cheese until smooth. Add the vanilla and icing sugar and beat until smooth. Using the whisk attachment, gradually add the cream and whip until the frosting is thick enough to pipe. (stand by and make sure the cream is whipped) Add more sugar or cream as needed to get the right consistency.
 
Sanding Sugar
Put the 2 tsp of sugar in a small bowl, add 1 or 2 tiny drops of blue colouring and stir until all the sugar changed colour.
Makes 12 cupcakes.
 
 
For Red Velvet Cupcakes, substitute and add in red food colouring instead of blue. Omit the blueberries.


Monday, September 17, 2012

Apple and Cinnamon Tea cake


I have some apples sitting around in my fruit basket and nobody seems to be eating it at all. I have to use it up before it lands into the dustbin. The apples still looked good enough to make a dessert out of it. I quickly flipped the pages of my Donna Hay magazines to get some ideas on what to do with these apples.
 
There it was staring at me from the April/May 2012 issue of Donna Hay magazine was the exact or rather perfect recipe to use up my three big Fuji apples.
 
You can use 4 smaller green apples but not soft and powdery apples for this recipe. Apples and Cinnamon go hand in hand and again they make good partners here. The only thing is that you bake this cake in a lower temperature and longer hours in the oven compared to the other cakes. Maybe because of the apples used I suppose. It taste good.


Apple and Cinnamon Tea Cake
Adapted from Donna Hay
 
Ingredients
 
185g unsalted butter, softened
200g sugar
2 tsp vanilla extract
3 eggs
225g plain flour, sifted                     
1 tsp baking powder, sifted
1 1/2 tsp ground cinnamon, sifted
125ml sour cream
 
Apple and cinnamon topping
 
3 Fuji apples or 4 green apples, peeled, cored, and quartered
1 tablespoon sugar
1 tsp ground cinnamon
 
Method
 
Preheat the oven to 160C.
Lightly grease a 22 cm round loose bottom pan and line it with baking paper.
Place the butter, sugar and vanilla extract in the mixer and beat till pale and creamy.
Add the eggs one at a time, beating well after each addition.
Add in the sour cream.
Now add the flour, baking powder and cinnamon mixture to the batter. Beat on low speed until just combined. Make sure the bowl is scraped down.
Spoon the batter into the prepared cake pan.
Cut a row of deep slits in each apple quarter and arrange on top of the cake batter.
Combine 1 tablespoon sugar and 1 teaspoon cinnamon and sprinkle over the apples.
Bake for 1 hour 15 minutes to 1 hour 25 minutes or until cooked when tested with a skewer.
Allow to cool in the pan for 5 minutes, turn onto a wire rack and cool completely.
Serves 8 to 10.


Sunday, September 9, 2012

Scones, Strawberry Jam & Chantilly Cream


Instead of tea time, I made this for breakfast. This is a good recipe and it is barely sweetened, very tasty, flaky and tender. You can make the dough a day earlier, put it in the freezer and bake it whenever you need it. For this recipe, you do not need to defrost the scones, bake it rock hard straight from the freezer, it IS that easy. I bake this whenever I run out of ideas for breakfast for the family.

The Scone is a small British quick bread, traditionally hailing from Scotland. They are usually made of wheat flour, with baking powder as a leavening agent. It is similar to but different from both a cake and a current bun.

The pronunciation of the word within the United Kingdom varies. Most of the British and Scottish pronounce it as "con" with the 's' in front. This is also the pronunciation of Australians, Canadians and New Zealanders. Other regions, particularly the United States, pronounce the word as " cone" with the 's' in front. British dictionaries usually show the "con" form as the preferred pronunciation, while recognising that the "cone" form also exists.

I like to eat my scones with Chantilly cream and homemade strawberry jam. They are a perfect match.


Scones (makes around 18)
 
Ingredients
 
60g raisins
470g flour
1 ½ tbsp sugar
1 ½ tbsp baking powder
1 tsp bicarbonate of soda
1 tsp salt
170 chilled unsalted butter
320g chilled whipping cream

For egg wash
1 egg yolk
30g cream

1.     Preheat oven 200 C
2.     Soak raisins in warm water for 15 minutes, drain and pat dry.
3.     Sift the flour, baking powder and bicarbonate of soda together.
4.     Whisk together flour, sugar, baking powder, bicarbonate of soda and salt.
5.     Toss in cut chilled butter and mix till fine crumbs using a pastry blender.  Add
      raisins.
6.     Make a well in the centre, pour in cream until it comes together.
7.     Do not over mix, as long as it comes together, stop mixing.
8.     Pat dough well using hands onto a lightly floured surface. Fold the dough into   
      half then to a quarter. This is to create layers in the scones.
 9.  Once again pat the thick dough into one inch thick.
10. Use 5 to 6 cm round cutter to cut scones.
11. At this point you can store the unbaked cut scones in a covered container in the 
      freezer between plastic wraps and bake it whenever you feel like it and there is
      no need to defrost first.
12. You can of course bake it straight away by putting the scones on a baking
       tray lined with baking paper or Silpat after step 10.
13. Mix the egg yolk and the cream together.
13.   Brush egg yolk mixture onto scones before baking.
14.   Bake for 20 min. Cool on wire rack. Serve warm with Chantilly cream and
       strawberry jam.
 
Chantilly Cream
 
Chantilly cream, or crème chantilly in French is to use to impress your friends, it is simply sweetened whipped cream flavoured with vanilla.
 
180 ml whipping cream
2 tbsp icing sugar
1/2 tsp vanilla extract
 
Whip cream at medium speed for 2 to 3 minutes, add icing sugar and continue to whip till soft peak forms.
 
 
Strawberry Jam
 
250g fresh strawberries (hulled and cut into halves)
100g sugar
Juice from 1/2 a lemon
 
Mix all the ingredients except the rose extract in a small pot over a small flame.
Stir often and cook till jam consistency.
Remove from flame and cool. 
 
                      Pastry Blender


Related Posts Plugin for WordPress, Blogger...